Loads of personal data are being exchanged for the sake of personalization every second. And that gives rise to a worrisome concern!
How can we regulate online privacy? Well, revealing too much information online leaves the door open to fraudulent activities.
Thanks to stronger security enforcement, you can decide what goes public and what stays private. With in-depth probing of the privacy settings of your social media accounts, you can enjoy a safe online experience.
As a marketer, we are using social media to promote our business. However, we still need to be conscious of our privacy. It is all too easy for hackers to get a hold of sensitive information.
In this post, let’s find out how to change social media privacy settings without affecting your growth and reach.
But first, learn what the whole point of this entire exercise is!
Why do you need to check your Privacy settings?
The photos and content uploaded to the social media platform are not always secure. They can be downloaded for identity theft, improper circulation, or other unethical activities. Therefore, it is vital to learn and understand how to use the privacy features that social media sites offer.
Consider using a reliable proxy service like proxy-cheap to maintain online privacy while using social media platforms.
Bear in mind that each social media platform has its settings, and some are more complicated than others. We’ll go through privacy settings for the most frequently used channels like Facebook, Twitter, LinkedIn, Pinterest, and Instagram.
Facebook Privacy Setting
Facebook allows you to set privacy from the Privacy tab, profile, and photo settings. Let’s take a look at each one.
1. Facebook Privacy Tab
You can access the privacy settings by clicking the down arrow in the extreme right corner of the feed page. Click on ‘Settings & privacy’ and then select ‘Settings’.
Click on ‘Privacy’ from the left panel to open the ‘Privacy Settings and Tools’ tab. You have plenty of categories to regulate your visibility. You can also manage privacy when you post on your timeline by using the audience selector. This control remembers your changes, so future posts will be shared with the same audience unless you change them.
It also has a feature that many people don’t know about. It is the capacity to limit the audience for old posts on your timeline. For example, let’s say you were posting publicly every time on Facebook, and you want to improve your security. Click the Limit Past Posts button. As a result, the content on your timeline you’ve shared with friends of friends or the public will change to friends.
However, there may be people who have already expressed interest in the post. Those who have liked, commented or been tagged in them may still see the post as well. Additionally, you have the option to change the audience of your posts individually. Just go to your post that you want to change and choose a different audience.
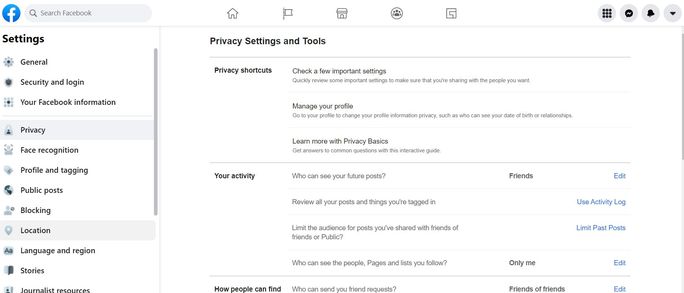
You can adjust a few other things, such as choosing who can send you a friend request. Also, you can determine who can look you up. This includes your personal information like an email address and phone numbers used to find you. Further, you can decide where to store message requests from friends of friends and others.
2. Facebook Profile Settings
Next, you must update your privacy settings on your Facebook profile. Go to your profile and click on ‘About’. Here you can access your basic information. Various sections like work, education, contact, family and relationship, life events and so forth will appear. In each section, you will find several items with separate privacy settings. Click the edit icon on the right side of each section and choose who can see the information: public, friends or customs to make the necessary changes.
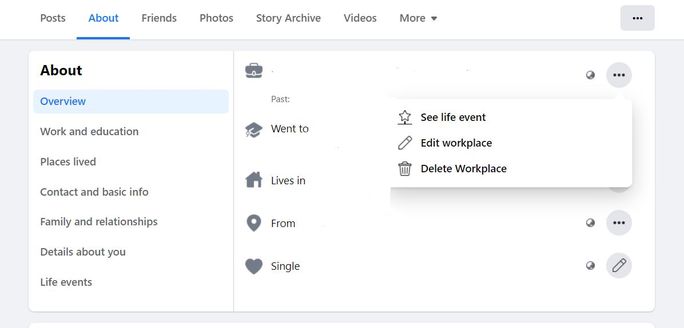
Here, you can customize each section within your profile to set your privacy to your comfort level. For example, if you want your work and education publicly known or to hide your contact and basic information, you can set it as per your requirement.
3. Facebook Photo Settings
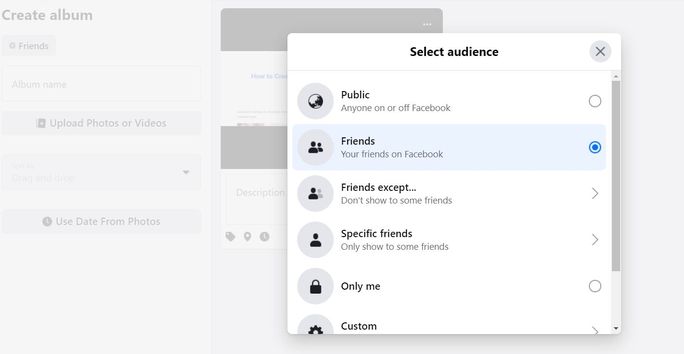
At last, adjust the privacy settings for the photo section. You can set your photo setting in two ways. The first is by album, and the second is by an image. If you upload photos into an album directly, click the audience on the bottom right side of the album to set privacy. For images you have uploaded individually, click on the desired image and select the edit icon to moderate specific settings.
Twitter Privacy Setting
Twitter’s privacy settings are straightforward. Either you have a private account, or you do not. By default, the ‘Protect my Tweet” setting is off. Respectively, this setting allows everyone to see your tweets, whether it is your follower or anyone searching on Google.
Hence, to change the privacy settings on your Twitter account, click on the More button and then on the ‘Security and privacy’ option from the left panel. Select ‘Your account’ and head straight to ‘Account information’.
Enter your password. Click on ‘Protected Tweets’ next. Check the ‘Protect your Tweet’ box to limit the tweet’s visibility to your followers. Uncheck the same if you want to approve each follower instead of allowing everyone to read your tweets.
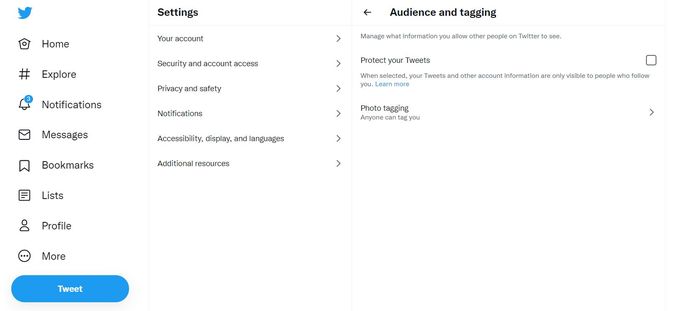
In addition, Twitter gives the option to add location to your tweet. When you tweet with the location, Twitter stores that location. You can change the “location on/off ” before each tweet. Also, you can decide whether users can find your Twitter profile with your email address or your phone number. After you have made any changes, make sure you click the save changes button at the bottom.
LinkedIn Privacy Setting
LinkedIn’s privacy setting is a little different from Facebook and Twitter. To change your privacy, click on the ‘Me’ button and select Settings & Privacy. There are many privacy settings here—however, most deal with how your information is shared on LinkedIn.
If you want to decide which information people can see on LinkedIn, click ‘Edit your public profile’. Deselect everything to keep all of your connections private.
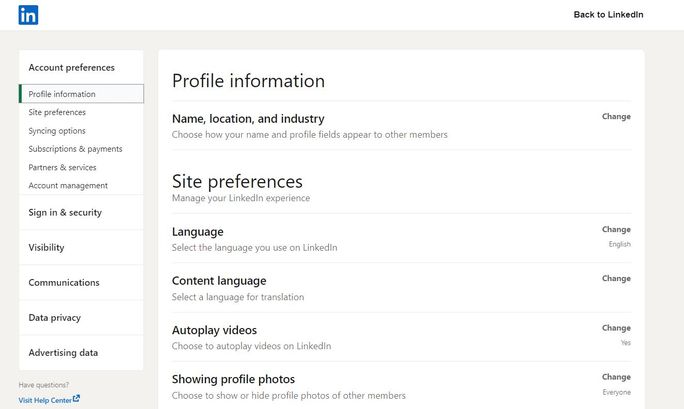
You can also make other changes under privacy control that includes who can see your activity feeds, your connections, unfollow, block people and much more. Simply click the link of the setting you want to change and make the modifications. Most importantly, make sure you save your changes before you navigate away.
Pinterest Privacy Setting
Pinterest is also a user-friendly site in terms of privacy. Pinterest wants your pins to be visible to other users when they search for them to re-pin and share so you can get the maximum visibility.
1. Search Privacy
If you don’t want your pin to show up in searches, you can easily change this setting. To make necessary changes, click on your profile icon on the right side. Go to ‘Setting’, and click on the ‘Account setting’. Here you will see many sections. Click on ‘Privacy and data’ and check/uncheck the preferred options.
2. Secret Boards
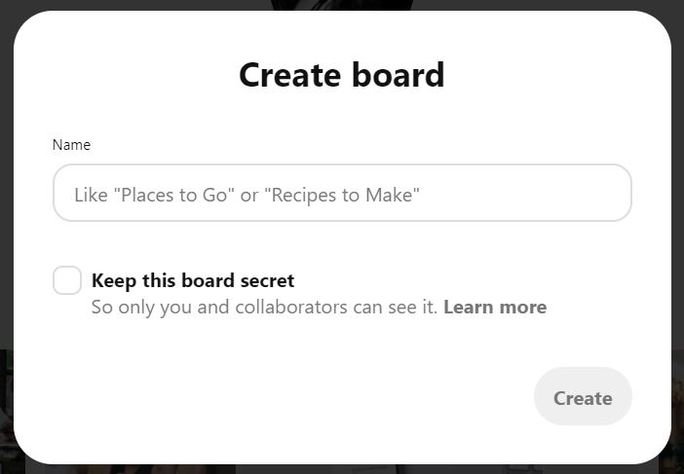
If you really want to keep some pins only to yourself, you can create a secret board. To create a secret board, go to your profile. Next, under the ‘Create Board’ option, you will find an option to create a secret board. Check the ‘Keep this board secret’ box to do so. You can create as many secret boards as you want. The only thing required is to add a name for your board, description, categories and so on.
Note:
You can change the secret board to the public, but you can’t change a public board back to the secret.
Instagram Privacy Setting
Just like Twitter and Pinterest, Instagram’s privacy settings are much more straightforward. By default, everyone can view your profile and posts and tag you in photos as well. However, you can make your posts private so that only your approved followers can see them.
Instagram’s desktop site has limited features, and you can’t edit the privacy of your image there. Therefore, you will have to use the mobile app for changing the privacy settings. Click on your profile icon and select ‘Settings’. Change the required sections from the Edit your profile tab.
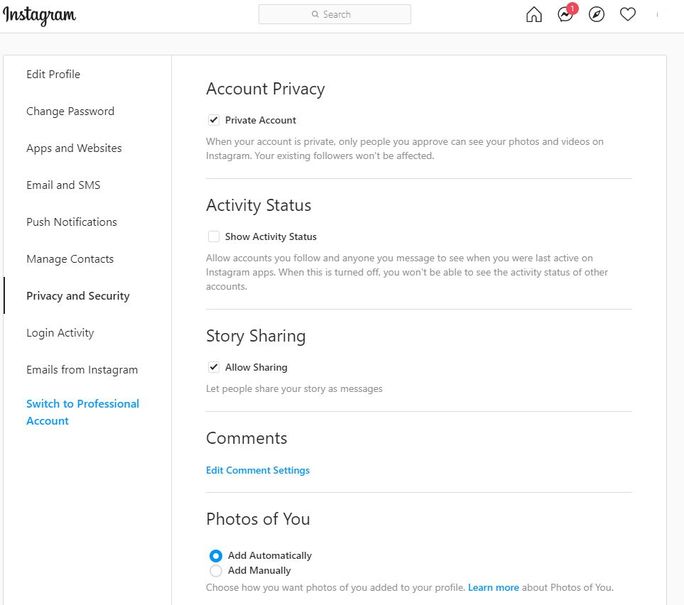
You can change the private account setting too. If you set it private, then only your users can see your photos. Even though you switch to a private profile, your current followers stay the same. In addition, if you want to block a particular follower, find that user’s profile and tap on the three dot icon to block or restrict them.
Note:
Even if you have a private post and you like a public post or comment on a photo or video that a public user has uploaded, it is still visible to everyone. Also, you can remove yourself from a tagged photo. This comes in handy if you find yourself tagged in a photo you do not want to be tagged in for professional reasons.
Conclusion
Social media privacy is a raging topic for individuals and marketers alike. Recent data breaches and information leaks have made it crucial to abide by privacy and security rules. While everyone is pulling up their socks to double their reach, one needs to take calculative steps to protect their content and profile from users with malicious intent. Keeping a check on security parameters should not come in between your end goals. Refer to the steps we mentioned above to stay protected without compromising on engagement.

